PHD Virtual has approached me for feedback on their upcoming PHD Virtual Backup 6.5. I have been granted access to an early beta version of the product to try it out, while they have added many enhancement to the product, the one that have got my attention the most is being able to send your backup or Archive directly to the Cloud. As I have not tried their backup to the Cloud feature which was released in 6.2, I have decided to test out combined with their new backup archiving to the Cloud feature to be introduced in PHD Virtual Backup 6.5.
With many Storage Cloud Services out there & many more expected to surface in upcoming few months, this backing up & in particular archiving could become of high demand. Further, as many of the Storage Cloud Services offers a price per GB that is very hard to beat with in-house storage, the solution will become attractive from cost perspective. As most things in the market today, the bigger bulk you buy of a certain item, the less you have to pay per item. This explain why Costco & Walmart(Mega Stores in general) for example can offer cheaper prices than smaller super markets. The same concept is at work when it come to storage, as companies like Google, Amazon, Rack Space & other Storage Cloud providers buy disks by betabytes(Huge Bulks), it will be near impossible to get the same price per GB for the storage running in your datacenter. The price difference gets even larger for smaller datacenters. In addition to the buying by bulk advantage these storage cloud providers have been stepping into the market more aggressively and they have to compete on price. That will bring the prices even lower.
A lot of companies today are considering shipping a copy of their backups to the cloud. Even if they keep just the latest set for speedy recovery, they could send the archive and older backup directly to the cloud with products like PHD Virtual Backup. While customers were always concerned about their data security when they ship it to the Cloud, PHD Virtual Backup 6.5 offer a solution to this problem by encrypting your backup data so even the Cloud Provider can not access your VMs without your encryption key. In this post, I will share with you which Storage Cloud services that PHD Virtual Backup 6.5 support and how to setup PHD Virtual Backup 6.5 to backup/Archiving for VMware vSphere/ESXi environment to Amazon S3 Storage Cloud Service. Let’s start by listing the different backup targets that PHD Virtual Backup 6.5 will support while highlighting the Storage Cloud Services one.
PHD Virtual Backup 6.5 Supported Backup/Archiving Targets:
- None Cloud Backup Targets:
- Attached Virtual Disk
- NFS (Network File System)
- CIFS (Common Internet File System)
- Cloud Backup Targets
- Amazon S3
- Google Cloud Storage
- Swift/Open Stack
- RackSpace CloudFiles
- Amazon S3 Compatible
The combination of both Cloud Storage and none Cloud Storage supported as a backup target by PHD Virtual Backup 6.5 should be giving enough choices to satisfy the most demanding customers. In this post, I will show you how to setup PHD Virtual backup 6.5 to work with Amazon S3, though the same steps can be used to setup your backup/Archiving for any of the other supported Cloud Storage Services offered by PHD Virtual backup 6.5. The main differences will be in where you will get the required info from the Storage Cloud vendor portal.
Setting up PHD Virtual Backup with Amazon S3 as backup target:
- To setup PHD Virtual Backup 6.5, you will first have to deploy the OVF appliance.
- Install the PHD Virtual Backup Client (Nothing but Next-Next-Next-Finish process).
- Power on the PHD Virtual Backup Appliance and then open the console.
- Hit Ctrl + n to get to the network configuration screens as showing in the below screenshot. Complete the configuration of your network then save it and wait for the appliance to reboot.


- Start your PHD Virtual Backup Console by right clicking any host of VM in your vSphere Client ==> PHD Virtual backup ==> Console

- As soon you open the console, you are welcomed with PHD Virtual backup Dashboard. Notice the system alerts at the bottom of the screen, you will need to use the “Configure Now” Links under recommended actions to continue with the configuration of the PHD Virtual Backup Appliance.

- Hit the Configure now link next to the “Hypervisor credentials have not been configured, which will get you to the screen to configure your hypervisor credentials as per the below screenshot. Complete your Hypervisor credentials for your vCenter or ESXi host depending on your environment then save the configuration.

- Alright now that you have your PHD Virtual Backup up and running it is the time to grab the information you need from your Amazon S3 account. If you don’t have an Amazon S3 account yet, then you will need to register for one at: http://aws.amazon.com/s3/. After getting your account go a head and login to your Amazon S3 Account to get the details you need to configure PHD Virtual Backup to send your backup to the Cloud. To get to your S3 expand the “Services” tab at the top of the screen and hit the “S3” link as shown in the below screenshot

- On the next screen, Hit “Create Bucket” and when a new screen open enter the name You would like to call that Bucket. This has to be a unique name that no one else is using on the S3 Storage Cloud. Then chose the closest datacenter to you to place your S3 Storage Bucket at as shown in the below screenshot(Make sure you write down the name of the bucket as you will need that during your PHD Virtual Backup Configuration).

- The Next Step is to obtain your Amazon S3 Security Credentials. From the top right side of the screen expand the “Welcome to AWS” drop down and then Choose Security Credentials as shown in the below screenshot.

- Under the Access Keys hit “Create New Root Key”. Accept when prompted then download the file including your keys as per the Screen shot below (Make sure to keep the contents of this file handy as you will need them during the configuration of PHD Virtual backup to the Cloud).

- Now you have all the information you need to configure PHD Virtual Backup for Amazon S3 Storage Cloud, go back to your PHD Virtual Backup Console. Under Configuration Tab => Backup Storage, Complete your Target backup storage information as shown in the below screen shot and explained right after it.

Below is an explanation of the fields in the above Screen Shot:
- Storage Type: Is your target storage and for Amazon S3 your will choose “Cloud: Amazon S3”
- Storage Path: This is actually the equivalent to your Amazon Bucket. Just fill it with the Amazon S3 Bucket name that you should obtained in step 9
- Access Key ID + Secret Key ID: are contained in the file you have downloaded in step 11
- Encryption PassPhrase: This one has confused me a bit initially as I was looking for it in the Amazon S3 portal, but it end up being an arbitrary encryption key that you come up with to make sure your data is encrypted and can not be accessed by Amazon staff. Choose any encryption key you think of for this one as long you will remember it.
- Next step is to configure some Local Caching disk space. This is an intermediate storage the PHD Virtual Backup use during backup and restore from Amazon S3 Cloud. You configure that by hitting the Configured button at the same screen you have configured your Amazon Storage at. (Note: If you are going to use the local Virtual Disk option like I am doing in here, you will have to add an extra disk to your PHD Virtual backup Appliance before completing this step).

- Now you are ready to initiate your VMs backup as usual and any backup you take will be sent to Amazon Cloud.

- Now I can see the files of my backup on Amazon S3 Cloud as shown below:

I believe the backup to the Cloud concept is quite interesting, & can have a great cost advantages but some time restoring from the Cloud might not be as quick as you would like. On the other hand, you rarely need if ever to restore from archive, so how about sending your archive to the Cloud instead. The below steps will show you how to deploy a second PHD Virtual Backup Appliance to Archive to the Cloud in particular Amazon S3 Storage Cloud.
Archive to Amazon S3 Storage Cloud with PHD Virtual backup 6.5
With the new archiving feature of PHD Virtual, you can back up to a local storage target and then have copies of the backups sent to the cloud in the background. To archive to the Cloud with PHD Virtual backup 6.5 you will require a second appliance for archiving, as enabling Backup Archive disables the ability to create backups with the archive PHD VBA. Create your first backup appliance as shown in the previous procedure and configure a local storage backup target. Then, go ahead and deploy a second PHD Virtual Backup appliance and configure its backup storage to Amazon S3 Storage Cloud using the same steps 1-13 in the previous procedure. After that follow the below procedures to configure the second appliance to Archive the backups of the first appliance to the Cloud:
1- Under the PHD Virtual Backup Console ==> Configuration ==> Disaster Recovery tab, use the options to add the PHD VBA backup data stores you would like to create archived copies from. In this case, it would be the VBA backing up to local storage.
2- In the” Backup Archiving Options” area, select “Enable Backup archiving for these data stores”.
3- Select the type of backup archiving to perform with this appliance by choosing the Archive Mode.
Backup Archive – Create archived copies of individual backups that have been flagged for Archive. Backups can be flagged for Archive using the Backup Catalog by selecting the backup and clicking Archive, or by enabling the archive option within the Backup wizard. After backups are copied to the archive target, the Archive flag is removed.
Backup Data Store Synch – Create an exact copy of your backup data store on the archive target data store. Any new backups created will be created on the archive target. Also, any backups removed from the source data store will be automatically removed from the target data store. Note that this option will disable Retention (Retention is performed on the source data store – any changes are reflected in the synchronized target).
4- Save your changes. You are done!
Note: Backups copied to the archive target will be displayed in the Backup Catalog alongside all other backups. Copies are displayed in blue text followed by an asterisk as shown in the below screenshot.

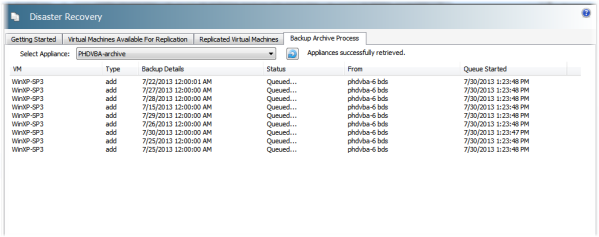
5- To view the current archive progress, use the Backup Archive Process tab in the console’s Disaster Recovery area as showing in the below screen shot.
Note: Both the archive PHD VBA and source PHD VBAs must be version 6.5 or later to use backup archiving, so what are you waiting for go head and upgrade to Version 6.5 today and start archiving to the Cloud!

Speak Your Mind