I have been asked repeatedly lately on how to get the vCloud Director Client Integration Plugin (CIP) working. I wanted to put this post out there to help you getting it working in no time. It is important to note that, the Client Integration Plugin (CIP) is only needed in vCD to carry out import and export of templates and media images.
To improve system security in vCD 8.20 and higher, the vCloud Director Client Integration Plug-In (CIP) is no longer bundled with the vCloud Director server installation. It must be downloaded from vmware.com. When you initiate any operation that requires this plug-in, the vCloud Director Web Console verifies that an appropriate version of the plug-in is installed in your browser, and prompts you to download and install a newer version if necessary.

Ok, first step first, before panicing and starting with the troubleshooting steps below, please start by ensuring you are using a supported browser. If you are using a browser that is not on the supported browsers list, then you need to shift to a supported one before trying anything else. Remember we have these support matrix for a reason. Below is a list of vCD 9.0 supported browsers:
The vCloud Director Client Integration Plug-in is compatible with recent versions of Google Chrome, Mozilla Firefox, and Microsoft Internet Explorer. Sorry, Microsoft Edge does not support Plugins, so Microsoft Edge can’t be used with vCD CIP.
Assuming you are using one of the supported browsers, below is few troubleshooting tips that can help you get vCloud Director CIP working:
- First trick to try is to remove your old installed Client Integration Plugin, clean up it is installation folder, reboot your machine, and try to install it again and see if that works
- Below tips categorized by browsers:
- Google Chrome:
- Try Google Chrome, as it seems to work right away most of the time.
- Please make sure to download the right version of CIP for Chrome as it utilze V6.0 rather than the V6.2 used by other browsers.
- Microsoft Edge:
- If you are using Edge browser, please utilize a different browser. As mentioned earlier while it is supported by vCD interface, it does not support the CIP plugin.
- Mozilla Firefox:
- If you are using a newer Firefox version, you will need to tweak it a bit to work with vCD CIP. The way you do that is as follow: Open URL: about:config and accept the risk dialog when it popup. Create new boolean, name it plugin.load_flash_only and assign value false. Restart Firefox and try again. Unfortunately you need Firefox ESR version 52 or below to modify the flag plugin.load _flash_only. This flag is removed in Firefox 53+.

- An alternative, You can download ESR release of Firefox which works out of the box from here.
- Internet Explorer 11:
- For CIP to work in IE11, you will need to add vCloud Director URL to the trusted sites + Enable Compatibility mode.
I have came up with another interesting issue when using the Self-Signed Certs. When using Self-Signed Certs you want to stick with Google Chrome. That has been said, even Chrome does not like Certificates that do not contain a Subject Alt Name, the default certificate for the Client Integration plugin do not contain a SAN and so the CIP is not loaded. To work around that, you will need to follow the below steps:
- Uninstall all the old Client Integration Plugins from the Programs and Features in control panel.
- Download the 2150215_csd-openssl.zip file attached to this KB2150215
- Before you extract 2150215_csd-openssl.zip, please make sure to right click it ==> Properties ==> and hit Unblock. If you don’t do this, it will not work. If you don’t see the unblock button, then you can ignore this as you might be not using UAC in your environment.

- Extract the 2150215_csd-openssl.zip file and copy the csd-openssl.cfg file to the below two locations.Note: If the locations do not exist, create them. C:\ProgramData\VMware\CIP\csd\ssl\csd-openssl.cfg
C:\Program Files (x86)\VMware\Client Integration Plug-in 6.0\csd-openssl.cfg - After copying the files, make sure to go to each of them and change security permissions to include Administrators and your user account with full permissions. If you don’t do that, the installer will fail to use the certificate.
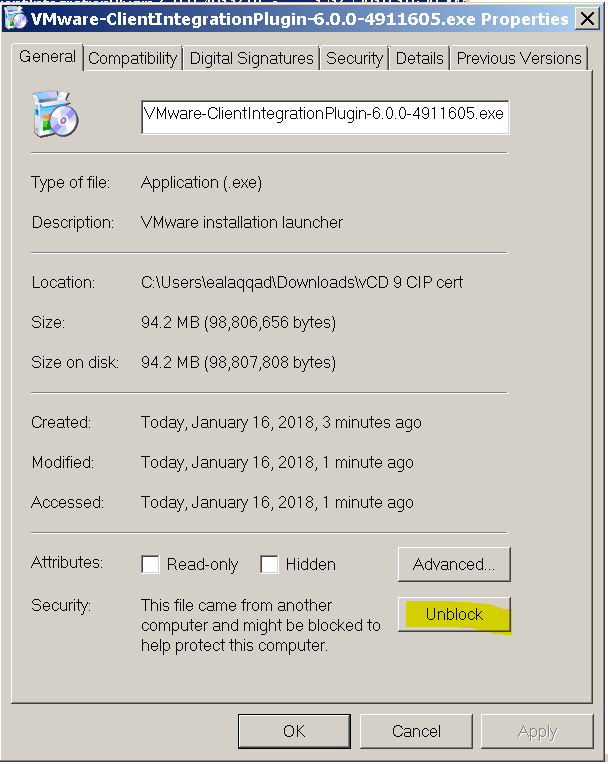
- After downloading the Client Integration Plugin and before you execute it, again make sure to right click it ==> Properties ==> and hit Unblock. If you don’t do this, it will not work. If you don’t see the unblock button, then you can ignore this as you might be not using UAC in your environment.
- Install the Client Integration plugin from the exe downloaded.
- Close and re-open Chrome and test the iso upload.
- If things are still not working, then try to import the cert into your browser as per the below steps:
- In the Settings, click SSL > Manage Certificates > Trusted Root Certification Authorities Tab > Import > Browse.
- Select All Files and click C:\ProgramData\VMware\CIP\csd\ssl\cert.der to import the cert.
Welcome your working vCD 9.0 CIP Upload Wizard.

I hope this help. If you have other tips on how you got it working, please post in comments :).

Are you using Windows 10 or Windows 7? I have tried all of these steps using Windows 10 and I am still unable to get it working.
Hi, I am using windows 7 to be honest. The good news, they have removed the use of vCloud Director Client Integration Plugin in 9.1 when using the HTML5 Client.
I’ve NEVER paid attention to that unblock button, but it solved my CIP issue for win10 version 20h2! The CIP would install, but the plug-in service kept installing with errors.
Many thanks for your post!