I have been lately involved in conducting integration between vCloud Director and a Cloud Provider Market Place. The Cloud Provider wanted to use vRealize Orchestrator (vRO) for this integration, as there is different integrations point they wanted to integrate with beyond vCloud Director and they did not want to learn multiple APIs. What is nice about vRO, after you learn it’s API, you can use it to execute workflows against multiple solution using a very similar API calls.
I was able to find them multiple articles on how to invoke vRO workflow from Rest API, but it was not easy to find one that showed my partner the full steps in a simple way, so I am sharing below what I have documented to help my partner with it from scratch.
Alright before we start on the API calls, I have created a simple vRO workflow “AWSNEW” that requires only one input variable “name”. My particular workflow will just deploy an instance to AWS, but in reality the workflow you are calling can be doing anything or talking to any different endpoint that is supported by vRO, and you will still be able to call it the same way.
To call a vRO workflow from Rest API, you will need to know the Workflow ID, and the inputs required. To find out the vRO workflow ID all you have to do is to go the vRO Client and check the general tab of your workflow. You will find a field called ID with your Workflow ID in it. As you can see below my workflow ID is: 3a0ab069-cf2f-47e0-96f5-4a8920a5dc51. Copy your workflow ID and keep it aside, as you will need it later. To find out your Workflow required inputs, just click on the

To find out your Workflow required inputs, just click on the input field tab. As mentioned earlier, my workflow requires only a single input called ‘name’. Please note that vRO API Calls are case sensitive when it comes to a parameters/input name.

Let’s get to the fun part. I will be using Google Chrome Advanced REST client (ARC) to construct and test my REST API calls.
In my lab, I am using non-signed certificates, which caused my calls to fail due to non-trusted certificates. If you are doing that in your lab, you can use the XHR extension to work around this. You can find this next to the method URL, just enable it and it will ask you to install ARC cookie exchange. Install it and that will get things working with a non-signed certificate. You might need to restart ARC to use ARC cookie exchange. If your vRO is using a signed certificate, you can skip this step.

Let’s start building our call within ARC. As we are planning to execute a workflow and provide inputs to it, we will need to use the post method. In ARC, Change the Method to Post, and in the request URL, your URL will look something like below:
https://<vRO FQDN>:8281/vco/api/workflows/<vRO Workflow ID>/executions
Below is how the URL in my lab looked like. My vRO FQDN is vtvro01.vt.com, and my workflow ID as noted earlier is: 3a0ab069-cf2f-47e0-96f5-4a8920a5dc51
URL used: https://vtvro01.vt.com:8281/vco/api/workflows/3a0ab069-cf2f-47e0-96f5-4a8920a5dc51/executions
Then you will need to add the following Headers by clicking add header.
Header Name: Accept Header Value: application/json
Header Name: Authorization Header Value: Basic YWRtaW5pc3RyYXRvckB2c3BoZXJlLmxvY2FsOllvdXNoaXRtZQ==
Below is what your Request URL and headers should look like in ARC.
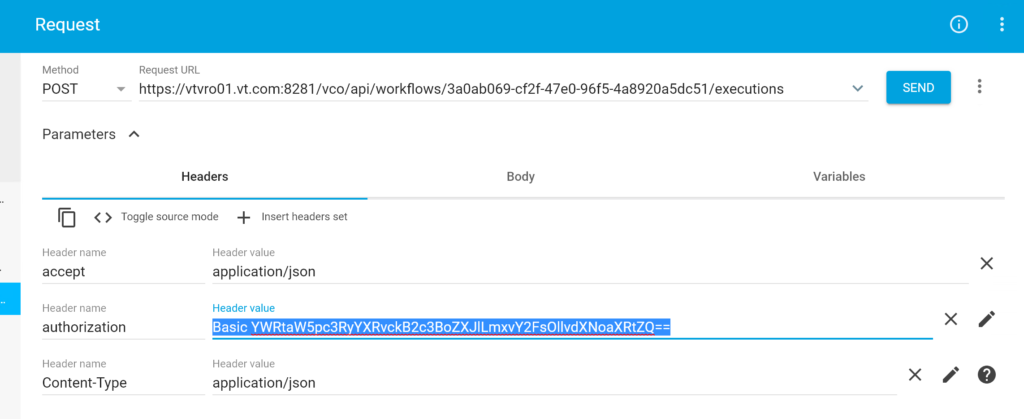
Just a quick note, I am using Basic authentication in here. While other types of authentication is possible basic authentication was acceptable for my demo and to keep this post as simple as possible. When you choose Authorization under header name. If you click on the pen sign next to the header value, you will be asked to enter your vRO Client user name and password and ARC will converted into the header value format. I have been using administrator@vsphere.local in my lab.
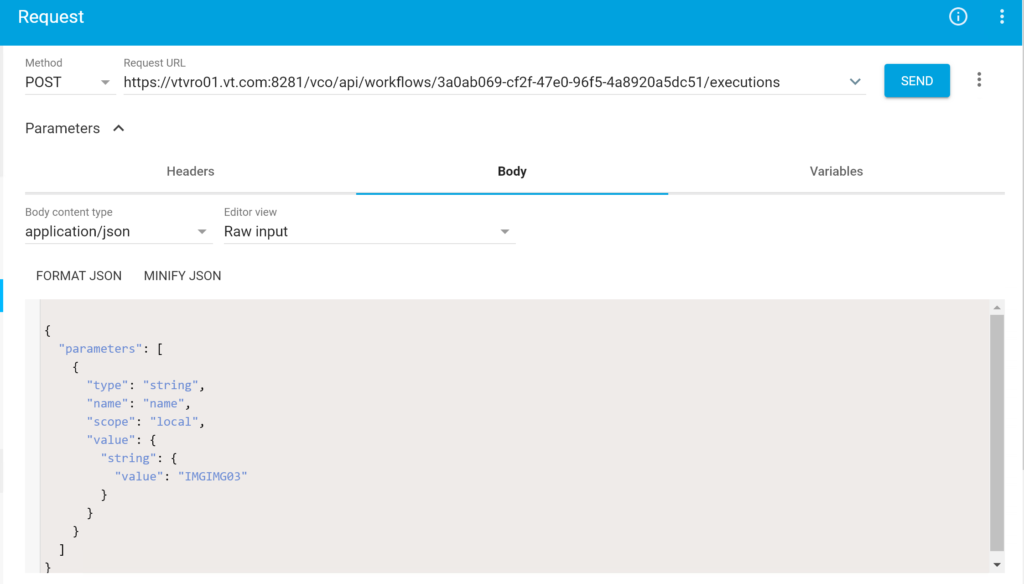
As I have mentioned earlier, my workflow will require a single input called “name”. To provide that over Rest API call using Arc, you will need to shift to the Body tab. In there make sure to switch the Body content type to JSON as showing in the below screenshot. Then you will need to provide your input using the following JSON format:
{
“parameters”: [
{
“type”: “string”,
“name”: “name”,
“scope”: “local”,
“value”: {
“string”: {
“value”: “IMGIMG03”
}
}
}
]
}
Now you can test executing your API call by hitting send. If it’s successful you should have a “202 Accepted” message as below.

You might want to have an API call to check on the status of your requests. Many third party portals demand that to be able to return the status of the request to it’s users. To construct that you can follow the exact same steps above, but change POST with GET and utilize the following URL instead:
https://vtvro01.vt.com:8281/vco/api/workflows/a9dd1bf8-92e4-4943-8e39-7a8f9c5915b2/executions?conditions=name~IMGIMG01
Note the part market in red in the above URL, it is what makes you able to list a particular run of your workflows by limiting it to a certain condition.
Hope you find this post helpful, and enjoy playing with vRO workflows.
One response to “Executing vRealize Orchestrator workflows using Rest API”
[…] the UI, I wanted to use the vRO REST API. Although there are a couple of blog posts such as this one which demonstrates how to use the vRO REST API, they all use a very simple workflow that only […]