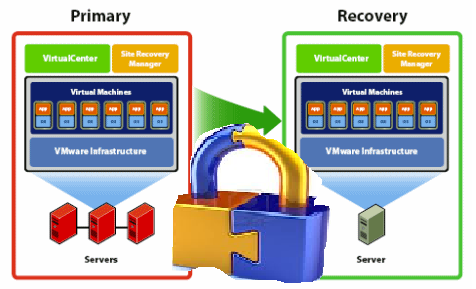
While setting up VMware SRM for a customer lately with a NetAPP filer, I have faced the challenge where the customer wanted to use the minimum required permissions for the user the Solution Replication Adapter (SRA) use to connect to the NetApp filer. At minimum the customer wanted to use a different account from root to be able to audit which user has carried out the changes. After doing my research, I have found out the below three ways to create users to be used by the NetApp SRA.
1- Use the NetApp Root user, if this does not violate your security policy then this is the easiest route as you will have to change nothing on the NetApp Filer. For a secure environments, I would recommend trying one of the below two methods.
2- Add a new user to the NetApp Administrator group, This seems to be the most commonly used as it is an easy way of doing it while allowing you to audit the filer activities. You will be able to distinguish which actions were invoked by SRM from ones that were invoked by the root account. Use the below commands at your NetApp console to create a new NetApp Administrator to use for your SRM SRA:
useradmin user add SrmUser -g AdministratorsOr if you want to use a domain user (Assuming your NetApp Filer was configured with Domain Authentication)
useradmin domainuser add DOMAIN\SrmUser -g Administrators3- Creating a specific permission role and add your SrmUser to it, While method 2 documented above allow you to create a distinguished admin to be used with the SRM SRA you will be granting that user unrestricted access to the NetApp Filer, where if you wanted to restrict the SRA to only the minimum required permissions you will need to follow the below steps:
a. Create a NetApp Role with only required permissions depending on your environment (SAN Only / NFS Only / NFS & SAN)
SRM Environment with NFS Only
FAS> useradmin role add SrmRole -a login-http-admin,api-system-get-info,api-system-get-version,api-system-cli,cli-ifconfig,api-ems-autosupport-log,api-net-resolve,api-qtree-list,api-snapshot-list-info,api-volume-clone-create,api-volume-online,api-volume-list-info,api-volume-size,api-volume-offline,api-volume-destroy,api-snapmirror-get-status,api-snapmirror-abort,api-snapmirror-quiesce,api-snapmirror-break,api-snapmirror-list-connections,api-snapmirror-set-connection,api-snapmirror-set-sync-schedule,api-snapmirror-set-schedule,api-snapmirror-list-schedule,api-snapmirror-list-sync-schedule,api-snapmirror-update,api-snapmirror-resync,api-vfiler-list-info,api-nfs-exportfs-list-rules,api-nfs-exportfs-list-rules-2,api-fcp-node-get-name,api-fcp-adapter-list-info,api-iscsi-node-get-name,api-igroup-list-info,api-lun-list-info,api-lun-map-list-info,api-lun-get-serial-number,api-igroup-add,api-igroup-create,api-igroup-destroy,api-nfs-exportfs-modify-rule,api-nfs-exportfs-delete-rules,api-nfs-exportfs-append-rules
SRM Environment with SAN Only
FAS> useradmin role add SrmRole -a login-http-admin,api-system-get-info,api-system-get-version,api-system-cli,cli-ifconfig,api-ems-autosupport-log,api-net-resolve,api-qtree-list,api-snapshot-list-info,api-volume-clone-create,api-volume-online,api-volume-list-info,api-volume-size,api-volume-offline,api-volume-destroy,api-snapmirror-get-status,api-snapmirror-abort,api-snapmirror-quiesce,api-snapmirror-break,api-snapmirror-list-connections,api-snapmirror-set-connection,api-snapmirror-set-sync-schedule,api-snapmirror-set-schedule,api-snapmirror-list-schedule,api-snapmirror-list-sync-schedule,api-snapmirror-update,api-snapmirror-resync,api-vfiler-list-info,api-nfs-exportfs-list-rules,api-nfs-exportfs-list-rules-2,api-fcp-node-get-name,api-fcp-adapter-list-info,api-iscsi-node-get-name,api-igroup-list-info,api-lun-list-info,api-lun-map-list-info,api-lun-get-serial-number,api-igroup-add,api-igroup-create,api-igroup-destroy,api-lun-online,api-lun-set-space-reservation-info,api-lun-map,api-lun-unmap
SRM Environment with both SAN and NFS
FAS> useradmin role add SrmRole -a login-http-admin,api-system-get-info,api-system-get-version,api-system-cli,cli-ifconfig,api-ems-autosupport-log,api-net-resolve,api-qtree-list,api-snapshot-list-info,api-volume-clone-create,api-volume-online,api-volume-list-info,api-volume-size,api-volume-offline,api-volume-destroy,api-snapmirror-get-status,api-snapmirror-abort,api-snapmirror-quiesce,api-snapmirror-break,api-snapmirror-list-connections,api-snapmirror-set-connection,api-snapmirror-set-sync-schedule,api-snapmirror-set-schedule,api-snapmirror-list-schedule,api-snapmirror-list-sync-schedule,api-snapmirror-update,api-snapmirror-resync,api-vfiler-list-info,api-nfs-exportfs-list-rules,api-nfs-exportfs-list-rules-2,api-fcp-node-get-name,api-fcp-adapter-list-info,api-iscsi-node-get-name,api-igroup-list-info,api-lun-list-info,api-lun-map-list-info,api-lun-get-serial-number,api-igroup-add,api-igroup-create,api-igroup-destroy,api-lun-online,api-lun-set-space-reservation-info,api-lun-map,api-lun-unmap,api-nfs-exportfs-modify-rule,api-nfs-exportfs-delete-rules,api-nfs-exportfs-append-rules
b- Verify the Created Role Permissions as follow:
FAS> useradmin role list SrmRole
c- Create an SRM Group and assign it to the SrmRole created in the previous steps using the following commands:
FAS> useradmin group add SrmGroup -r SrmRole
d- Create the desired user and add it to the SrmGroup as follow:
FAS> useradmin user add SrmUser -g SrmGroup
You can as well use a domain account instead if your NetApp Filer is connected to AD using the following command:
FAS> useradmin domainuser add Domain\SrmUser -g SrmGroup
e- Setup the password for the created account will need to be done as the root user using the command passwd as follow
Retype new password: (Password is hidden)
To check how complex the password must be on your filer you can use the following command: options security
The method you use in your environment will depend on your requirements, while the third option was the most secure option the second seems to be the most widely used due to simplicity and the amount of permissions the SRA account requires. Hope this help!


We’re about to implement SRM on top of NetApp controllers as part of an ongoing data center refresh project. This info will come in handy, thanks! Do these instructions work for both 7-Mode and Cluster-Mode implementations?
Hi Dee,
I believe the same instruction should be valid for both 7-Mode and Cluster-Mode as the NetApp handle credentials about the same way in both modes.
Thanks,
Eiad